Today I'm going to start detailing the beginnings of my final blocking, for which I enlisted the help of Evercoat Slick Sand. But first, everything begins with finishing up the hood scoop from where I most recently left off...
I decided I did not want the turn signal indicators in the hood scoop so...
 |
| I roughed up the edges of the fiberglass with 180 |
 |
| Then laid down fiberglass cloth with fiberglass resin, using a simple Bondo fiberglass patch kit that can be had anywhere (even Wal*Mart) for $20. It's cheaper than buying the components on their own and having a lot of material left over in the end. |
 |
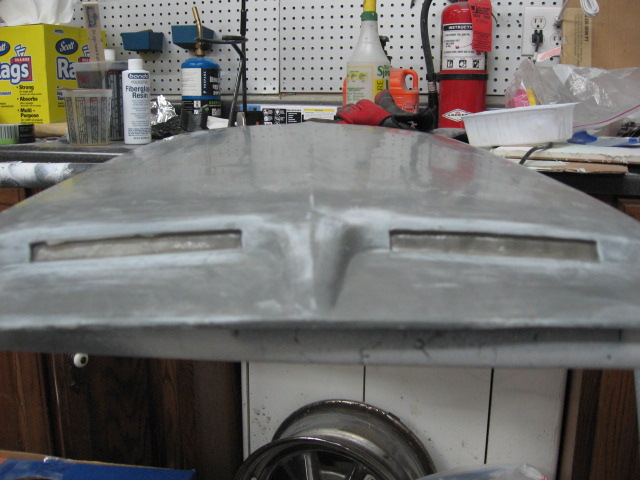
| This is with the cured cloth/resin. |
 |
| I then skimmed the opening with Evercoat fiberglass filler. |
 |
| And skimmed that with Evercoat EZ Sand 2k glazing putty for a smooth finish. |
 |
| The next step was to spray with Epoxy, then Slick Sand. I bought this gun from TCP Global for about $45...with a 2.5 mm tip it's nothing short of a cannon. It is fantastic quality and shoots the Slick Sand unreduced perfectly. |
 |
| After the fiberglass had UV cured by sitting outside for 5 days, I shot it with Epoxy. |
 |
| And there is no trace of a hole ever being present in the turn signal openings. Any tiny imperfections will get covered up by the Slick Sand. |
 |
| I then shot the scoop with 2-3 coats of Ever Coat Slick Sand, an extremely high build primer/surfacer. It's actually sprayable polyester filler. The hoodscoop was very wavy since it is a fiberglass part, and I wanted to do an experiment to see if I could completely block out the waves using only Slick Sand and no skim coat of filler. Truth be told, I didn't think it would happen. |
 |
| Tape along the center ridge line and block up to this; it will keep the center ridge straight and sharp, and prevent reshaping of the ridge line. The Slick Sand dries quite hard and is difficult to initially block. In the end I have found that starting with 120 works great to cut, then 220 to remove the 120 scratches. To my surprise, after blocking the scoop down, and then shooting with another 2 coats, the entire scoop blocked completely flat without the use of any skim coating filler. |
|
Along with the hood scoop, I also shot the roof, driver's side door, and top of the trunk with several coats of Slick Sand, usually shooting 2 at a time, blocking, then shooting more. Here are some tips I have either read or learned on my own:
- Buy a cheap gun to shoot Slick Sand. That way if it sets up in your gun, you're not out your good gun.
- Buy a gun with a large enough tip. It seems somewhat defeating the point if you buy a high build product, only to be thinned out so it doesn't build as well. I think Ever Coat recommends at least a 2.0 mm tip. My 2.5 mm tip was plenty sufficient.
- Do not leave the Slick Sand in your gun for more than 30 minutes or it risks setting up. I did not mix more than I could shoot in 30 minutes. At the moment I added the hardener, I started the timer, which would include mixing, spraying, and flash times.
- Do not use an in-gun strainer, or even filter the product as it pours into the gun. The gun I bought had an internal strainer and the Slick Sand basically spit and sprayed poorly. I removed that and was back in business. I eventually even stopped filtering it as I poured it into the gun because it would take so long to drain through my filter. Even unfiltered I had no hitches when spraying.
- Start cutting with 120, then move to 180 or 220 for final blocking. Once the initial layer is off, it sands very nicely. It will spray on with lots of peel so the initial blocking seems to bounce right over the top.
- A lot does not go a very long way. I mix up half a quart at a time. I pour out 16 ounces, and then add half a tube of hardener (11 ml, to be exact) to the 16 ounces. The tube of hardener has graduations on the side so you can see how much to add. One gallon comes with four tubes of hardener; one tube per quart. Mix well (it greatly thickens upon adding the hardener) then spray, allowing for adequate flash. Half a quart basically allowed me to shoot one coat on my hood scoop, door, roof, and trunk lid before it was all gone. I then poured some lacquer thinner in the cup, swished around, and sprayed the lacquer thinner out to get everything out of the gun's system, then mixed up more and sprayed a second round. In doing this I never end up wasting any and I don't risk it setting around too long and setting up in my gun.
- Spray when it's cool outside to keep it from setting up too fast. I sprayed early on when it was 60's and 70's out. It's been over 100 consistently for the last week or two (108F yesterday) and I'm glad I got most of it out of the way.
- Mask off anything you don't want overspray on WELL. This is definitely overspray you don't want to have to remove. Additionally, it makes the floor sticky so I laid a blue tarp on the floor and painted over this. I had read about this ahead of time so did not have to end up with a sticky garage floor.
All in all, I have used 3/4 gallon between the roof, trunk, one quarter, one door, hood, and hood scoop. The hood is final blocked, as is the door, roof, and trunk. The quarter is close but will probably require another coat or two. The moral of the story is it will probably require 2 gallons to do an entire car. I still have another quarter to do. I may have to end up getting another quart.
Final thoughs on Slick Sand: Amazing build and sands great once you've cut off the top layer. You can keep blocking and blocking and blocking before you see signs of breaking through. The advantage of this is you can keep blocking until the last of that guide coat is gone and still have room to shoot another layer of guide coat and block it again. It did amazing things with my quarter that definitely had a few spots my hand could feel after my metal working (and filler work), which was probably sub par at best, I admit. I was counting on the Slick Sand to be my crutch and it really was.


Great blog! I am working on a 1966 Mustang. It is a lot of work, but a lot of fun. Thanks for sharing your work.
ReplyDeleteThis comment has been removed by the author.
ReplyDeleteI love the Slick Sand Stuff.. I much rather sparey than mess with skim coating with putty..
ReplyDelete